Overview
This article will review Aline CRM-Enquire's legacy outlook calendar connection for Office2016 and Office365.
This setup is based on using a service account with Impersonation Account access.
This version also supports the use of Delegate access. If you would like to know more about Impersonation vs Delegate access, please reference Microsoft's documentation.
NOTE: Microsoft no longer recommends this method due to digital security risks with impersonation access. Our newest connection method does not require an Impersonation account. Please reference our other setup article to setup without an impersonation account. Creating a user for a service account
Step 1: Sign in to Office 365 using your credentials.
Step 2: Navigate to the Office 365 Admin center by clicking the app launcher icon (9 small squares) in the top left and click Admin.
Step 3: On the left click Users, then click Active users.

Step 4: Towards the top of the page, click + Add a user.
Step 5: Populate the necessary fields. Make sure to uncheck the box for Make this user change their password when they first sign in.
Step 6: Record the User name and password as you will need these data point to complete the CRM setup portion.
Setup Service Account with Application Impersonation
The following steps will add the role of Application Impersonation to the service account user. This will automatically give your Service Account user read and write access to your user's calendar as well as the Send As permissions to send email.
Note: With Application Impersonation, you are not required to manually add permissions for read and write access to a user's calendar or Send As permissions for sending email. Your service account will automatically have these permission for all current and newly added users.
Step 1: Navigate to https://outlook.office365.com/ecp/
Step 2: Log in using your Office 365 credentials and you will be taken to the Exchange Admin Center.
Step 3: Click Roles, then click admin roles.

Step 4: Click the plus sign above the table to create a new Role group.

Step 5: In the new role group pop up, type in a name in the Name field.
Step 6: In the Permissions Section, search for "ApplicationImpersonation"

Step 7: Select Application Impersonation from the list, click Next
Step 8: Add Service Account to group, click "Finish".
You now have a service account that will impersonate other user's mailboxes that your Enquire Administrator can configure with Enquire Exchange Sync.
Note: You will not need to perform the section below if you have already-performed the steps above.
Alternative Service Account Setup:
Manually add Read and Write permissions to user calendars and Send As permissions.
If you do not want to use the Application Impersonation role, you will need to manually add the read and write and Send As permissions using the methods below.
Note: These permissions will need to be added to current users in your Exchange server as well as any new users added moving forward.
Grant Send As permissions via Office365 online portal:
This will allow users to send emails from Enquire and display the from email as their own.
Step 1: Go to Office 365 admin center > Users > Active Users
Step 2: Choose the user you want, then click Edit next to Mailbox permissions
Step 3: Click Edit next to Send as.
Step 4: Click the Add permissions button.
Step 5: In the search box, type the name of the service account user you created.
Step 6: Click Save once you've selected the service account user.
Grant Send As permissions via Exchange Online Powershell:
Step 1: Connect to Exchange Online PowerShell.
Step 2: Connect to your Exchange Online Server.
Step 3: Run the following cmdlet for each user to add Send As permissions:
Add-RecipientPermission -Identity user@company.com -Trustee impersonationuser@company.com -AccessRights SendAs
Grant read/write access to user calendars:
Step 1: Connect to Exchange Online PowerShell.
Step 2: Connect to your Exchange Online Server.
Step 3: Run the following cmdlet for each user to add read/write calendar access (update emails for your users):
Add-MailboxFolderPermission -Identity user@company.com:\Calendar -user impersonationuser@company.com -AccessRights Editor
Grant read/write access to user tasks
Step 1: Exchange Online PowerShell.
Step 2: Connect to your Exchange Online Server.
Step 3: Run the following cmdlet for each user to add read/write tasks access (update emails for your users):
Add-MailboxFolderPermission -Identity user@company.com:\Tasks -user impersonationuser@company.com -AccessRights Editor
Impersonation Account
Step 1: Create a new service account user on your Exchange server.
Step 2: Open the Exchange Management Shell.
Step 3: Run the following cmdlet to assign the Application Impersonation role to your newly created service account:
New-ManagementRoleAssignment -name:impersonationAssignmentName -Role:ApplicationImpersonation -User:serviceAccount
Note: This will provide your service account impersonation access to all users. You can follow Microsoft's impersonation article if you would like to set impersonation access for specific users and groups.
Step 4: Run the following cmdlet for each user to add read/write calendar access:
Add-MailboxFolderPermission -Identity user@company.com:\Calendar -user impersonationuser@company.com -AccessRights Editor
Step 5: Run the following cmdlet for each user to add read/write tasks access:
Add-MailboxFolderPermission -Identity user@company.com:\Tasks -user impersonationuser@company.com -AccessRights Editor
Step 6: Run the following cmdlet for each user to add Send aspermissions (this will allow users to send emails from Enquire and display the sent from user as themselves):
- On-premise Exchange:
Add-ADPermission <Mailbox> -ExtendedRights "Send As" -User <User> - Exchange Online:
Add-RecipientPermission <Mailbox> -AccessRights SendAs -Trustee <User>
Step 7: Add Send As from Exchange Management Console
Step 8: In the Exchange Management Console, click to expand the Recipient Configuration node, and then click the Mailbox node
Step 9: Right-click on the mailbox which the user will be sending from, then click the Manage Send As Permission... option.
Step 10: Click the Add button.
Step 11: Use the Select User or Group window to search for the required user, select the user and click OK.
Step 12: Click Manage to apply the changes.
Step 13: Click Finish to close the wizard window.
Microsoft Auth Registration App setup
Follow the instructions below once you have opted in to OAuth for Office.
Step 1: Login to your Azure Portal (https://portal.azure.com).
Step 2: Use the search field at the top of your browser screen to search for App Registrations.

Note: You will select the option under services for App Registrations and continue with the instructions below.
Step 3: Click New registration

Step 4: Give the app any name you would like, and under Redirect URI choose Web in the dropdown and add the redirect URL: https://account.enquiresolutions.com/integrate/authorizeews, and then click Register.

Step 5: In the left-hand menu, choose Certificates & Secrets and then click New Client Secret. Give it a description (i.e. Aline Calendar Sync) and time length (recommend to change 90 day default to 2 years) and then a new client secret will be created.
Note: Save the client secret value and store it somewhere as you will no longer be able to access it after leaving the page.


Step 6: Next, choose API permissions in the left-hand menu.
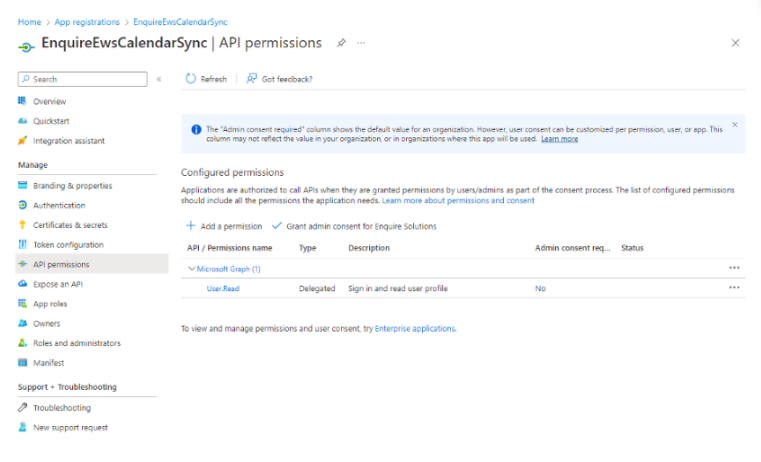

Step 7: Next, click Add a permission and select the tab APIs my organization uses. In the search type in Office 365 Exchange Online and select it in the results. In the next screen select Delegated permissions


Step 8: Expand the group EWS and check EWS.AccessAsUser.All and click Add permissions.

Step 9: Click Add Permission and you should see the EWS.AccessAsUser.All scope listed under Office 365 Exchange Online. Choose the option Grant admin consent for {your organization}.

Step 10: Choose Overview in the left-hand menu to view your Application (Client ID) and Directory ID (Tenant) and record them.

Step 11: Locate your EWS URL (this URL will end with .asmx):
- You can use the Microsoft test connectivity tool to auto discover your URL if you do not know it.
- You can also open Exchange Management Shell on your server and type the following command:
Get-WebServicesVirtualDirectory |Select name, *url* | fl
Note: You will not need this EWS URL if you are currently using Office 365.
Step 12: Gather all the data points below to continue to setup the CRM portion.
- Service Account Credentials (If not adding yourself)
- Outlook Exchange version
- Outlook URL if not O365
- Service account Name
- Service Account Password
OAuth Credentials
- Client ID
- Tenant ID
- Client Secret Value
Note: The Client Secret Value is NOT the Client Secret ID
CRM Admin setup
Aline CRM Calendar Sync Admin setup instructions
Note: You will need CRM admin user permission to setup this portion.
CRM LOGIN:
Step 1: Login to Aline CRM (Enquire) and then access admin section from left-hand menu.

Step 2: Select 'Exchange' in left hand menu.

OR
Navigate to https://account.enquiresolutions.com/integrate/exchange
ADD HOST:
Step 3: Click 'Add Host' button in top-right of exchange Hosts visual.

Step 4: Complete the new host form and save:
- Select "EWS" as host type
- Create a host name (i.e. "Client Calendar Sync")
- Leave community field as "All Communities", unless adding community specific host
- Add the three App registration credentials captured from your EWS registration app.
- For O365 add this URL: https://outlook.office365.com/EWS/Exchange.asmx. Otherwise add your exchange URL.
- 'Send Email" should be checked to allow users ability to send emails directly from CRM activities module
- 'Sync All Day Tasks" Should be unchecked, this allows scheduled events set to all day to also be synced to Outlook tasks section.
- Select the activity types you want to sync from CRM to Outlook. Recommended to select face-to-face type events.
- Select an activity type for sync from Outlook to show events in CRM calendar. Can use default such as "Appointment", or add a new activity type specific to sync such as "Calendar Appt"

IMPERSONATION USER:
NOTE: For digital security we recommend removing the impersonation account and using the direct user authentication method. But we are maintaining Impersonation access for Legacy clients.
Legacy Accounts:
If you already have an existing impersonation account, the email and password can still be updated through the legacy Exchange module by editing the host. This account we still need to be authenticated when using OAuth. On Prem servers may have an old connection method that does not use OAuth tokens.
NOTE: Impersonation User token will be attached to the user that authenticates the account.
For new Impersonation accounts follow the instructions below:
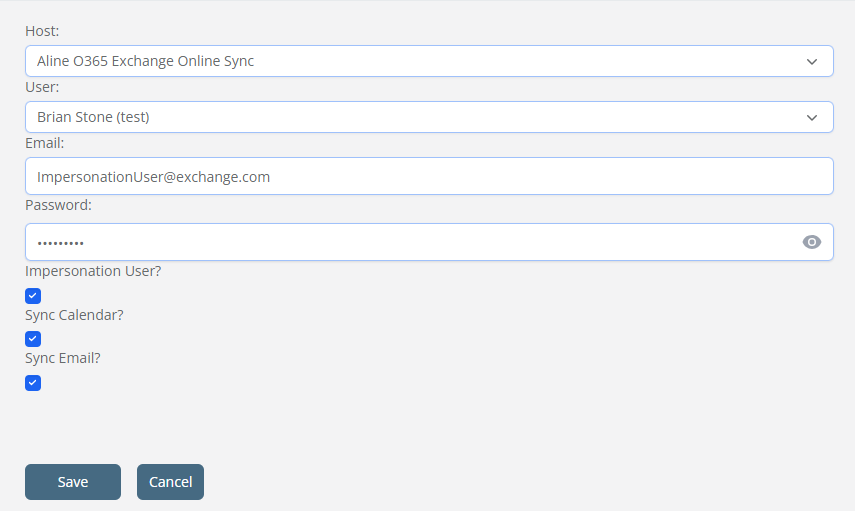
Step 5: Click 'Add EWS Account' to add users to sync.

Step 6: Complete the form for the impersonation user
NOTE: currently the Impersonation account needs to be connected to the CRM user.
- HOST: Select the Host name the impersonation account will be used for.
- USER: Select yourself as the user.
- EMAIL: Add the impersonation account email
- PASSWORD: Add the impersonation account password
- Impersonation User?: Should be checked.
- Sync Calendar?: Should be checked
- Sync Email?: Should be checked
Step 7: Authenticate the impersonation account:
Note: If you have successfully set up the Host and impersonation user they will now be listed in the Exchange accounts section. You can trigger the Auth banner to all admins by clicking the Key icon on the user OR go to https://account.enquiresolutions.com/integrate/exchange
Note - "Opt-Out" button on banner simply closes the banner.
If you do not see this banner and your host server is setup, proceed to link above to manually authenticate.

The link above or Auth banner link will take you to the Microsoft auth popup to enter the impersonation account email and next password.

If you receive a completed response you are now syncing. Your account is now pending and may take up to a half hour to initiate sync.

If you receive an error response, please validate the impersonation account permissions and Auth credentials.
Note: you must be logged into the CRM while completing the auth.
ADD USERS:
Step 5: Click 'Add EWS Account' to add users to sync.
Step 6: Add Calendar host and select user to add. (NOTE: Users can add themselves once the host is added.)
- Password and Impersonation checkbox will be left blank, this is only used when adding an impersonation account.
- Check 'Sync Calendar'
- Check 'Sync Email'
- Uncheck 'Sync of All Day Tasks' to prevent all days tasks from sync into Outlook task Section.

Step 7: Continue to add all users you would like to use the Calendar sync. Users will get a notification in the CRM to Authenticate their O365 account name and password.
The CRM Admin portion is now complete.
NOTE: Sync will start as soon as users are when using a Impersonation account.
Post Connection - Individual User Self Setup
User Self Setup
Once the company server is setup, users can setup / disable their own accounts to sync their Exchange accounts with Enquire CRM. You will only need to follow these steps if the user account is added after the Exchange server is setup.
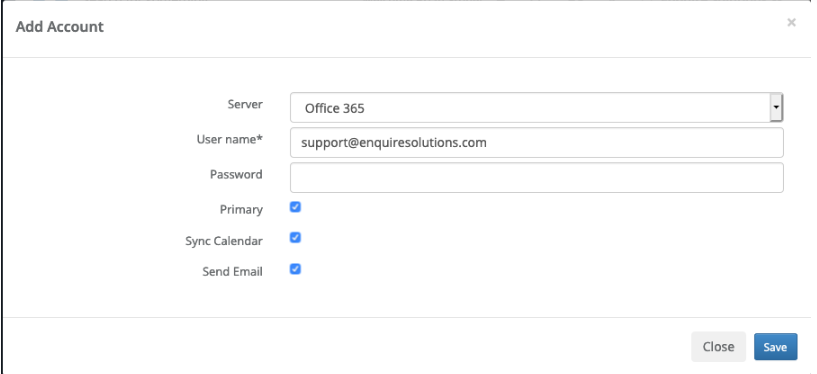
Step 1: Click Settings at the top left of the left hand menu, and click Email

Step 2: Click Add Account
Usage
Enquire to Outlook Calendar Sync
Note: The calendar sync with Enquire will sync events to and from your default Outlook calendar. You can verify or change your default calendar by following Microsoft's Change the default calendar support article.
The calendar sync portion of our Exchange/Outlook integration works in the background and is continually syncing when activities are created. Enquire will sync Timed activities, and All Day activities if selected in server setup:
Activities with a start and end time will sync to the calendar in Outlook. When a timed activity is successfully synced to your Outlook calendar, it will display at the date and time specified in Enquire and the subject set to the name of the activity in Enquire. The event notes/detail will contain a link to the activity and individual in Enquire.

All day activities
Activities marked as All Day will sync to the tasks section in Outlook. When an all day activity is successfully synced to your Outlook tasks folder, it will display with the date specified in Enquire and the title set to the activity description in Enquire. The task notes/detail will contain a link to the activity and individual in Enquire.

Outlook to Enquire Calendar Sync
When events from your Outlook calendar are successfully synced to your Enquire calendar, they will display on your calendar at the time specified in Outlook and as the activity type setup by your Admin. Hovering over the activity will display additional information about the activity.

Activity Updates
Cancelling Activities/Events
Cancel an activity in Enquire
If an activity that was synced to Outlook is cancelled in Enquire, it will be removed from your Enquire and Outlook calendar.
Cancel an event in Outlook
If an event that was synced to Enquire is cancelled in Outlook, it will be removed from your Outlook and Enquire calendar.
Rescheduling Activities/Events
Reschedule an activity in Enquire
If an activity that was synced to Outlook is rescheduled in Enquire, the original activity will be removed from your Enquire and Outlook calendar and a new activity will be created at the rescheduled date and time.
Reschedule an event in Outlook
If an event that was synced to Enquire is rescheduled in Outlook, the original event will be removed from your Enquire and Outlook calendar and a new event will be created at the rescheduled date and time.
Deleting Activities/Events
Delete an activity in Enquire
If an activity that was synced to Outlook is deleted in Enquire, it will be removed from your Enquire and Outlook calendar.
Delete an event in Outlook
If an event that was synced to Enquire is deleted in Outlook, it will be removed from your Outlook and Enquire calendar.
Send Email from CRM
The Send Email functionality allows you to send emails from Enquire using the Send Email tab on the activity box.
Step 1: Navigate to the individual you would like to send an email to.
Step 2: Click the Send Email tab along the top of the activity box.
Note: If your account does not have the Send Email functionality setup, you will receive the following warning:

Note: If the individual you are attempting to send an email to doesn't have an email address entered, you will receive the following warning:

- Enter the individual's name in the "For" field and choose the suggested individual, choose a template if you have one setup, enter a subject, and body for the email and click Send.
If your email was sent successfully, you will see the following success message:

and a Completed activity with a Description of the email's Subject and a corresponding note with the Email's body will be created:


 and a Cancelled activity with Failed to Send appended to the Description will be created
Note: Emails are sent from the impersonation account on behalf of the user. This causes the "sent" record to not populate to the users outbox in Outlook.
Note: Enquire does not handle the replies to emails sent from Enquire CRM. Replies to these emails will only be sent to the user's Outlook.
Emails can be pre-populated using templates. Please visit the following Templates Help link to learn more about using templates .
NOTE: Email sends from CRM require a success response from Outlook before creating the "Email Out" activity. This causes a few minute delay in the activity creation on the profile.
NEW! - Email Send Editor for O365 connections
We have added new functionality when sending emails directly from the CRM.
NOTE - These new features only work with O365 connection. Older MS Offices versions will not provide this enhanced features
- Add multiple individuals from the case
- Add images
- Add Attachments
- Add Links
- Advanced text formatting

Troubleshooting
Calendar Troubleshooting
If you create an activity with a specified start and end time, your Outlook or Exchange calendar will create a calendar event and notify you per your Outlook or Exchange calendar notification settings (e.g. Remind me 15 minutes before events begin). This will happen regardless of when the activity was created.
This will create an event on your Outlook or Exchange calendar once it has finished syncing and notify you immediately because it thinks the event hasn't happened yet.
This will create an event in your Outlook or Exchange calendar once it has finished syncing. It will notify you prior to the event based on your Outlook or Exchange calendar notification settings (e.g. Remind me 15 minutes before events begin).
If you create an activity without a specified start and end time by checking the activity as an All Day activity, your Outlook or Exchange calendar will not create a calendar event. Outlook or Exchange will instead create a To-Do list item in your Outlook or Exchange.
Some things to be aware of when creating all day activities:
- If you create an activity with the All Day check box checked AND a Status of Complete, the activity will not show up on your To-Do list in Outlook or Exchange.
- If you create an activity with the All Day check box checked, but a Status other than Completed, the activity will remain on your To-Do list until it is either Completed or Deleted.
- Because creating an All Day activity doesn't display a specific start and end time when an activity took place, we suggest noting the time within the description for the activity:

FAQ's
When will the sync be active?
- When using an impersonation account, the sync is active once the impersonation user is authenticated. Each user account will need to be added to accounts section to connect to impersonation account.
Can I set up multiple O365 Hosts?
- Yes, each community can have their own host, Communities with no location specific host will default to company level host.
What if I have a separate O365 host for a small group of communities?
- You will need to setup a community specific host for each location in your small group and then add the same app registration credentials to each community level host.
Will events synced from Outlook pull into reports?
- No, Events synced from outlook will not carry into the reporting database
Can I see activities in the past or future?
- The calendar in Enquire will display Outlook activities that have occurred within the last 2 days and scheduled Outlook events in the next 90 days.
Can I see Outlook Events in the past or future on my CRM calendar?
- The calendar in Enquire will display Outlook activities that have occurred within the last 2 days and scheduled Outlook events in the next 90 days.
- This can happen for a few reasons, so make sure the following are correct:
- When scheduling an activity, make sure that the All Day checkbox isn't checked. Remember: all day activities show in the Tasks section of Outlook and not on the calendar.
- Make sure the start time of the activity is prior to the end time.
- Updates from Enquire to Outlook are not real time, it can take up to 45 minutes for an activity to appear on your Outlook calendar if created in Enquire.
How do I trouble shoot if my host is using an impersonation account?
- The impersonation user will show in the Admin > Exchange > EWS user section to validate the token and look for errors. The impersonation user may need re-authenticated if the token becomes invalid, or if you need to update the OAuth Client Secret value.
- NOTE: All Admin users should get notified once the Token is no longer valid for the impersonation user.
- If you are having troubles with Syncing your Outlook or Exchange here are some things to try.
- Check with your Network Administrator to confirm everything has been setup with your company's Exchange Web Services (EWS)
- Your Network Administrator must authorize your Exchange account to use Exchange Web Services (EWS) with Enquire CRM.
- Make sure you are using the correct Exchange Network credentials when setting up your Exchange Sync in Enquire CRM.
- Note: These are not your Enquire CRM credentials. Please check with your Network Administrator if you are unsure what your credentials are.
How do I re-authenticate a Impersonation user?
- Gather the Impersonation user Email and Password.
- Authenticate the account by going to https://account.enquiresolutions.com/integrate/exchange
- Once the Impersonation user has a valid token, the calendar sync will resume for all connected users.
What are the sync errors that can occur
- The following is a list of potential statuses an account can have. If Enquire CRM needs to re-sync your Exchange server, it will try four times using your credentials and display a status for each user based on the outcome.
Status Description Access Denied Calendar/Task Folder Specified folder could not be found in the store. The incorrect permission is chosen, impersonation or delegate. Denied Access (Forbidden) 403 error (forbidden) or unauthorized client. The service account doesn't have access the user. Error - Not Syncing General Error Message. Could be caused by a time out or troubles when syncing. EWS Server giving Internal Server Error An internal server error occurred. Try again later. Potential down time that will often resolve itself after a period of time. Exchange Version Not Supported Exchange Server doesn't support the requested version. Impersonation Failed The account does not have permission to impersonate the requested user. Invalid Calendar or Task folder This property was requested, but it wasn't returned by the server. Invalid Server URL The remote name could not be resolved. Occurs when the EWS url has been entered incorrectly. Mailbox Not Setup on EWS The SMTP address has no mailbox associated. Verify that the user's email address is spelled correctly and has the correct domain. Not Enabled The process (sync calendar or send email) is not currently enabled for the user. Syncing The process (sync calendar or send email) is correctly enabled and functioning. Unattempted No Items - no items to sync. The account has been added, but doesn't currently have any activites/calendar events to sync. Unauthorized (401) Unauthorized. The username or password for the service account is incorrect.
- First connect to the Exchange Online PowerShell
- This cmdlet will return a list of users your impersonation account currently has Send As permissions for
Get-RecipientPermission -Trustee "impersonationuser@company.com"
- This cmdlet will return the calendar permissions the Impersonation User has for the specified user.
Get-MailboxFolderPermission -Identity user@company.com:\Calendar -User impersonationuser@company.com
Was this article helpful?
That’s Great!
Thank you for your feedback
Sorry! We couldn't be helpful
Thank you for your feedback
Feedback sent
We appreciate your effort and will try to fix the article