TABLE OF CONTENTS
- Overview
- Outlook App Registration setup instructions
- Aline CRM Admin Two-way setup instructions
- Usage
- FAQ's:
Overview
For Outlook O365 we offer two integration functions:
1) Calendar sync and Direct email from CRM.
2) Two-way email sync that will auto-record emails as CRM activities and notes.
This article provides step-by-step setup instructions for Outlook 2-way email sync / Aline CRM.
Enquire uses an OAuth 2.0 user consent flow. If you are not an admin in your Azure Active Directory, please share these instructions with your Microsoft administrator.

NOTE: We will provide instructions to setup two separate app registrations in your Azure portal app for 1) Two-way Email Sync & 2) Calendar Sync.
Outlook App Registration setup instructions
Step 1: Log in to your Azure Portal (https://portal.azure.com) and search for "App Registrations". You will select the option under services for 'App Registrations' and continue with the instructions below.

Step 2: Click 'New registration'

Step 3: Give the app your preferred name, and under Redirect URI choose 'Web' in the dropdown and add the Redirect URI and then click 'Register'.
Redirect URI for United States Customers: https://account.enquiresolutions.com/integrate/authorize
Redirect URI for Canadian Customers: https://crm.ca.alineops.com/integrate/authorize

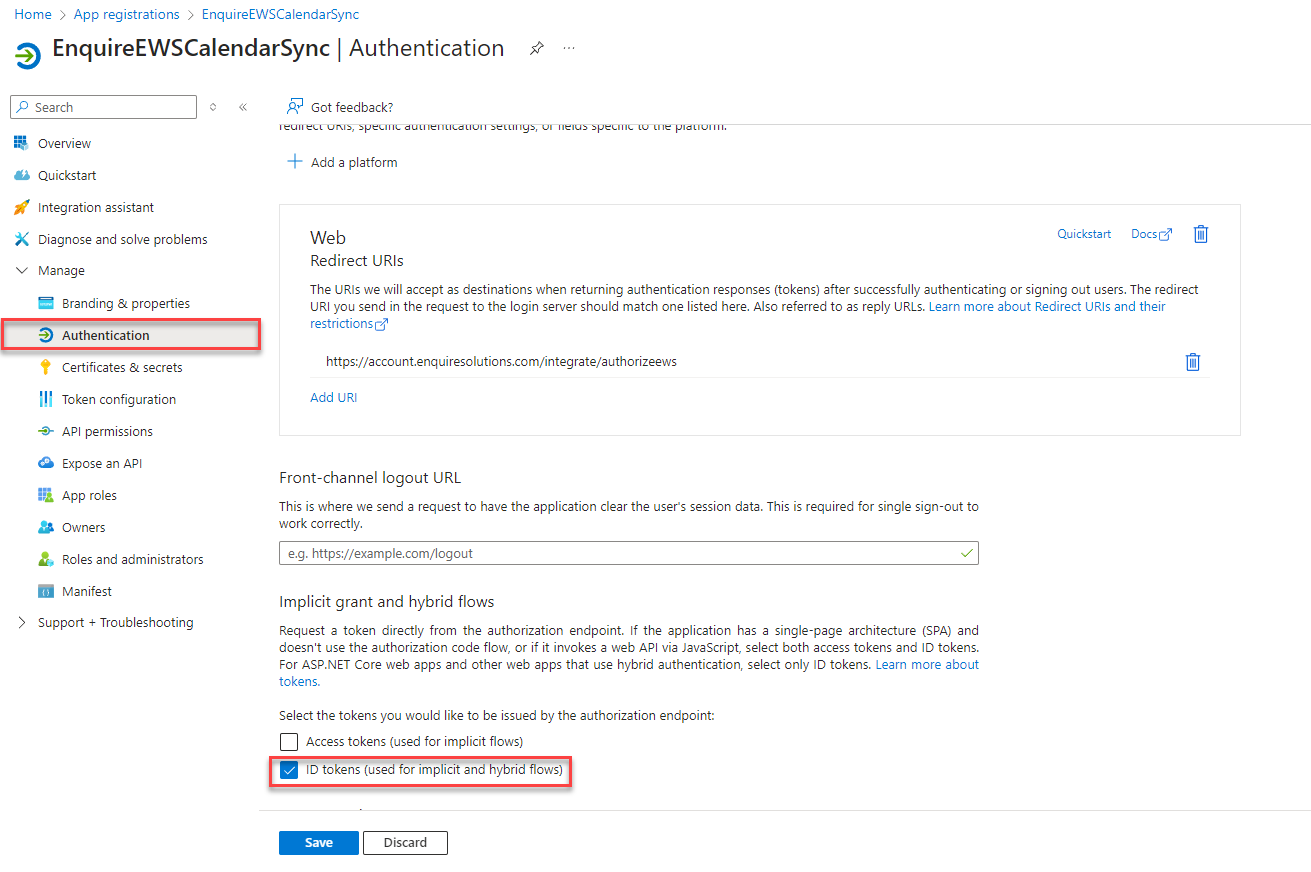
Step 4: Click 'Authentication' in the left-hand menu and then check the box 'ID tokens'.
Step 5: In the left-hand menu, choose 'Certificates & Secrets' and then click '+ New Client Secret'.

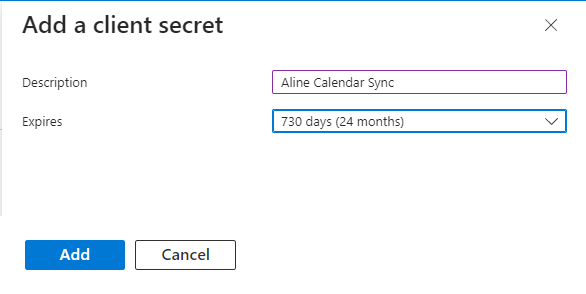
Step 6: Give the Client Secret a description (i.e., Aline Calendar Sync) and adjust the expiration length of the Client Secret (Recommended to change 90 days default to 24 Months), and then a new client secret will be created.
Note: Save the client secret value and store it somewhere as you will no longer be able to access it after leaving the page.
Step 7: Click the copy icon next to Secret Value and paste it into a notepad. This will be needed later to complete the setup.

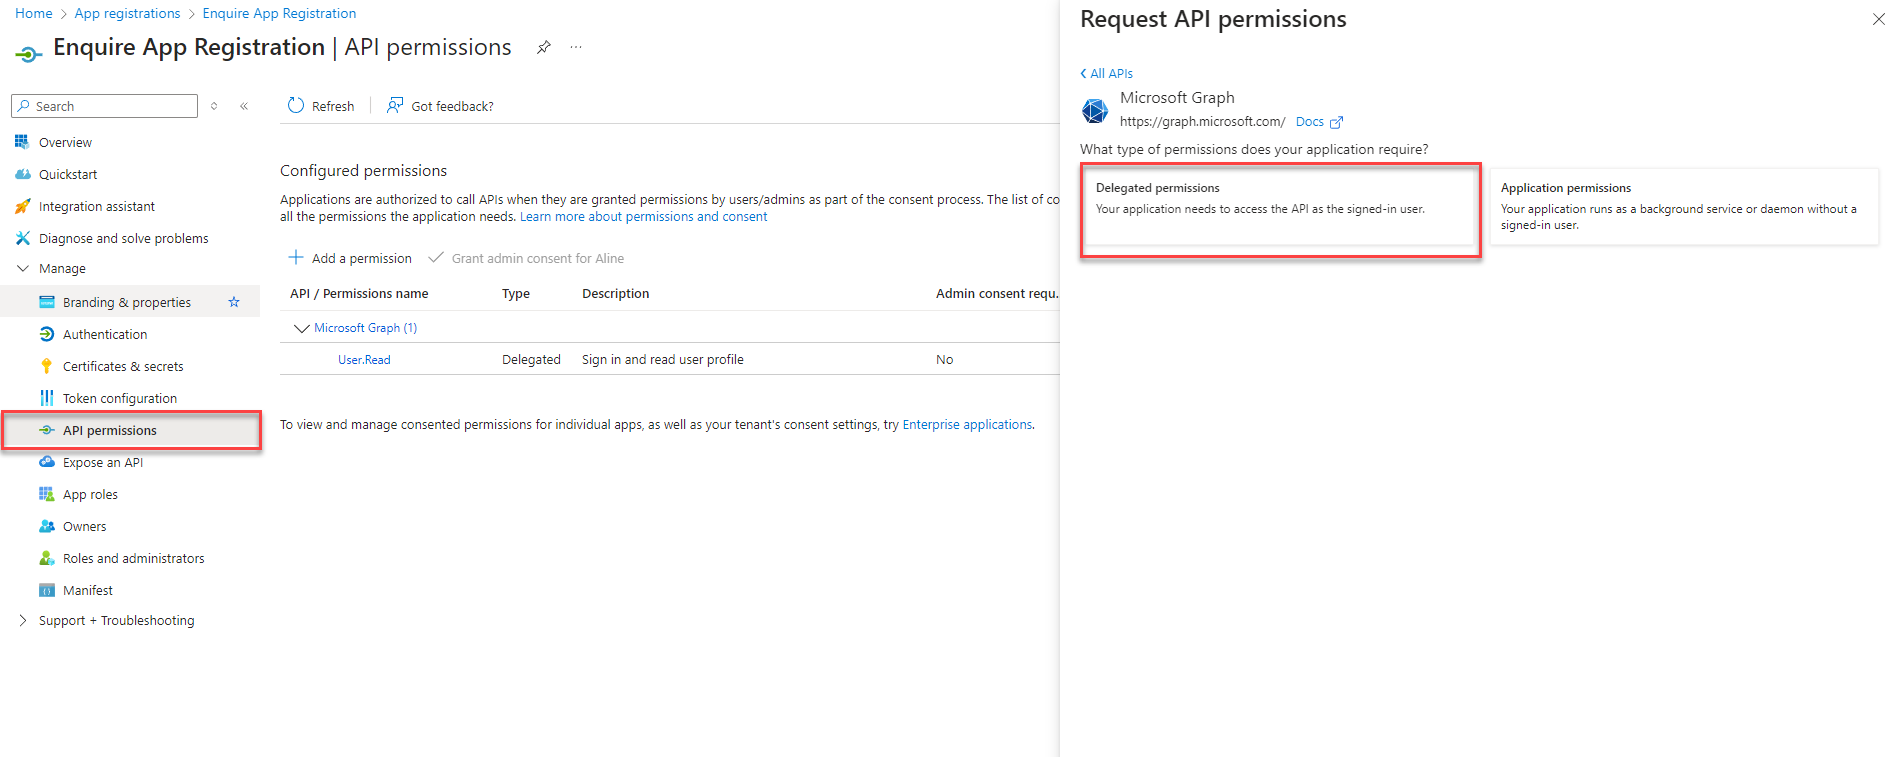
Step 8: Next, choose 'API permissions' in the left-hand menu and then click '+ Add a Permission'.

Step 9: Select the tab 'Microsoft APIs' in the right-hand pane and then choose 'Microsoft Graph'.

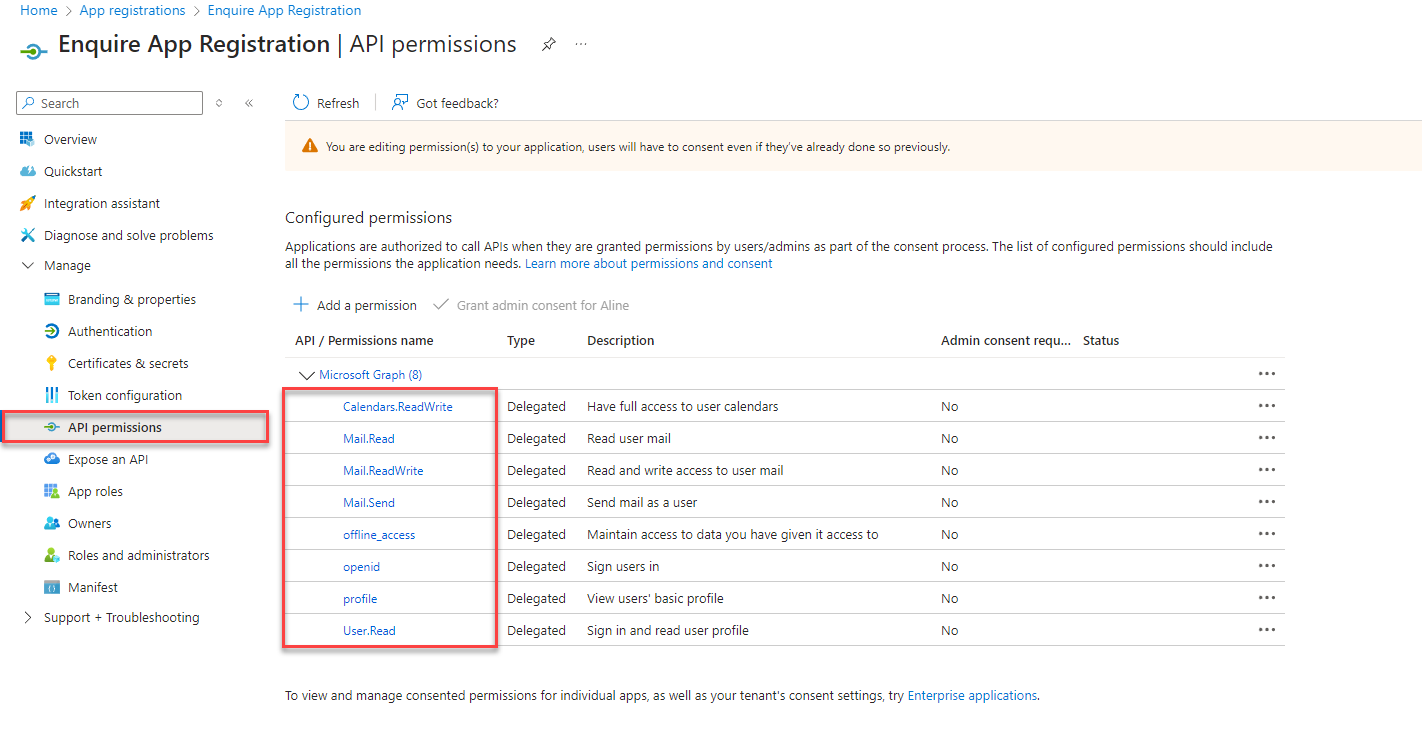
Step 10: Select 'Delegated permissions' and then search for the following permissions and select their checkbox:
- Mail.Read
- Mail.ReadWrite
- Mail.Send
- offline_access
- profile
- openid
- Calendars.ReadWrite

Step 11: Click 'Add Permission' and you should see the following screen. Note: You must be Privileged Role Administrator to complete this step.
Step 12: Select 'Grant Admin Consent for {your organization}' for the above permissions.

Step 13: Lastly, choose 'Overview' in the left-hand menu to view your Application (Client) ID and Directory (Tenant) ID and record them.

Step 14: After completing the steps above, please ensure you have the credentials below for the CRM setup portion.
- Client Secrets 'Secret ID'
- Tenant ID
- Client Secrets 'Value'
Note: The Client Secrets 'Value' is NOT the Client Secrets 'Secret ID'.
Your App registration is now complete. Proceed to CRM self-service setup.
Aline CRM Admin Two-way setup instructions
Note: You will need CRM admin user permission to setup this portion
CRM Login
Step 1: Login to Aline CRM (Enquire) and then access 'Admin' section from the left-hand menu.
Step 2: Select 'Email / Calendar' in the left-hand menu
 |  |
Add Host
Step 3: Click the 'Add Host' button in the top-right of the Hosts section of the page.

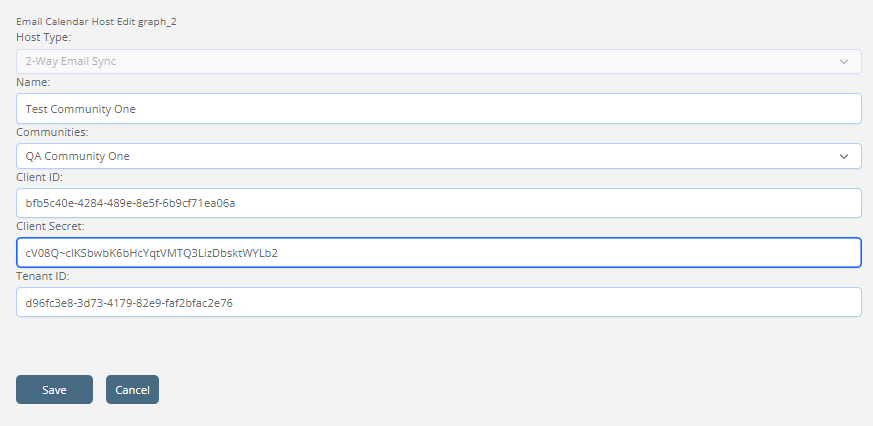
Step 4: Complete the new host form and save:
- Select '2-way Email Sync' as host type
- Create a host name (i.e., "Client name or Community name 2-way Email Sync")
- Leave the community field as 'All Communities', unless adding a community-specific host.
- Add the three Auth credentials captured from your Office registration app.
Note: If you do not have the 'Client Secrets Value' saved, you will have to repeat the app registration in Azure.
- Click 'Save'
Add Users
Step 5: Click 'Add 2 Way Email Sync Account' in the Two Way Email Sync section to add users to sync

Step 6: Add a 2-way email host and select the user to add. Then 'Save'.

Step 7: Continue to add all desired users by repeating steps 5-6 for them to use the 2-way email sync.
Note: Users may also add themselves with our "Outlook User-Setup for 2-way Email" Article.
Step 8: Refer back to the 'Hosts' section. For O365 2-way, click the Key icon to send a notification banner to all users to authenticate.

The CRM Admin portion is now complete.
NOTE: Sync will not work until the user has authenticated their account to establish the user token.
Usage
Emails will only sync if the following two conditions exist:
- The emails contain a matching email on a CRM profile
- You are the assigned user on that profile.
If both Conditions are met, then outbound and inbound emails from your account will sync to the lead profile as "Email Out" and "Email In" activities, and the message body will be included in the notes on the profile.
NEW! - Email Send Editor for O365 connections
We have added new functionality when sending emails directly from the CRM.
NOTE - These new features only work with O365 connection. Older MS Offices versions will not provide this enhanced feature
- Add multiple individuals from the case
- Add Images
- Add Attachments
- Add Links
- Advanced text formatting

FAQ's:
When will the sync be active?
- Each user must authenticate in the CRM before their sync will be active.
What emails will sync to the CRM?
- Email In/Out will only sync if the client email address value exists on a CRM Individual profile, AND the user is the assigned user on the profile. If both conditions are met, then the email will create an Email In/Out activity and a note on the individual profile.
Can I set up multiple O365 Hosts?
- Yes, each community can have its own host. Communities with no location-specific host will default to the company-level host.
What if I have a separate O365 host for a small group of communities?
- You will need to set up a community-specific host for each location in your small group and then add the same OAuth credentials to each community-level host.
How do I troubleshoot if the sync stops for a specific user?
- Admin users can view each user's sync status in the Exchange 2-way email visual section by
- 1) By viewing the last synced activity date.
- 2) By clicking on 'Token Details' to see if the user token is still valid.
The user may need to re-authenticate themselves if the token becomes invalid.
How do I troubleshoot if the sync has stopped for everyone?
- If the OAuth Client Secret value expires, all tokens will become invalid. The admin will need to update a new Client Secret value to the host and then
- Each user will be prompted to re-authenticate their User Token to restart the sync.
If the sync is stopped and then restarted, will missed emails then sync?
- No, once you restart the sync, only new emails from that point on will sync.
Can I send emails directly from the CRM?
- Yes.
Does the CRM need specific activities for this integration?
- Yes, the CRM will need activities with the Master Types of "Email Out" and "Email In", and then will grab the first activity in the list with the master value attached.
Can I update the host after creation?
- Yes, but currently, you will need the Client Secret Auth value to re-enter to make any updates
Was this article helpful?
That’s Great!
Thank you for your feedback
Sorry! We couldn't be helpful
Thank you for your feedback
Feedback sent
We appreciate your effort and will try to fix the article