Overview
The Office 365 integration provides two functions:
- Calendar sync and direct email from CRM.
- Two-way email sync that automatically records emails as CRM activities and notes.
This article provides step-by-step setup instructions for the Office 365 integration with Aline CRM.
Aline CRM uses an OAuth 2.0 user consent flow. If you are not an admin in your Azure Active Directory, please share these instructions with your Microsoft administrator.
These instructions set up one app registration in your Azure portal that covers both email and calendar.
How the connection works
Aline CRM connects to Office 365 using Microsoft's standard OAuth 2.0 sign-in and the Microsoft Graph API, the same framework Microsoft uses for other trusted business integrations. Aline never stores user passwords; each user grants access through Microsoft's own sign-in screen, and Microsoft issues a secure token that Aline uses to read and send mail and calendar data on that user's behalf.
Once connected, Microsoft notifies Aline CRM in real time whenever a relevant email or calendar event changes, rather than Aline repeatedly checking the mailbox. Access can be revoked at any time from your Azure Active Directory admin center by removing the app registration's consent, which immediately stops sync for every connected user.
Outlook App Registration setup instructions
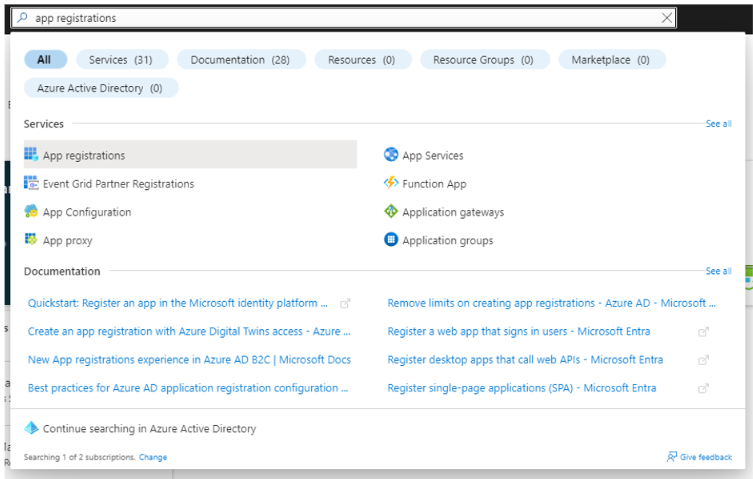
Step 1: Log in to your Azure Portal (portal.azure.com) and search for "App Registrations." Select the option under services for App Registrations and continue with the instructions below.
Step 2: Click New registration.

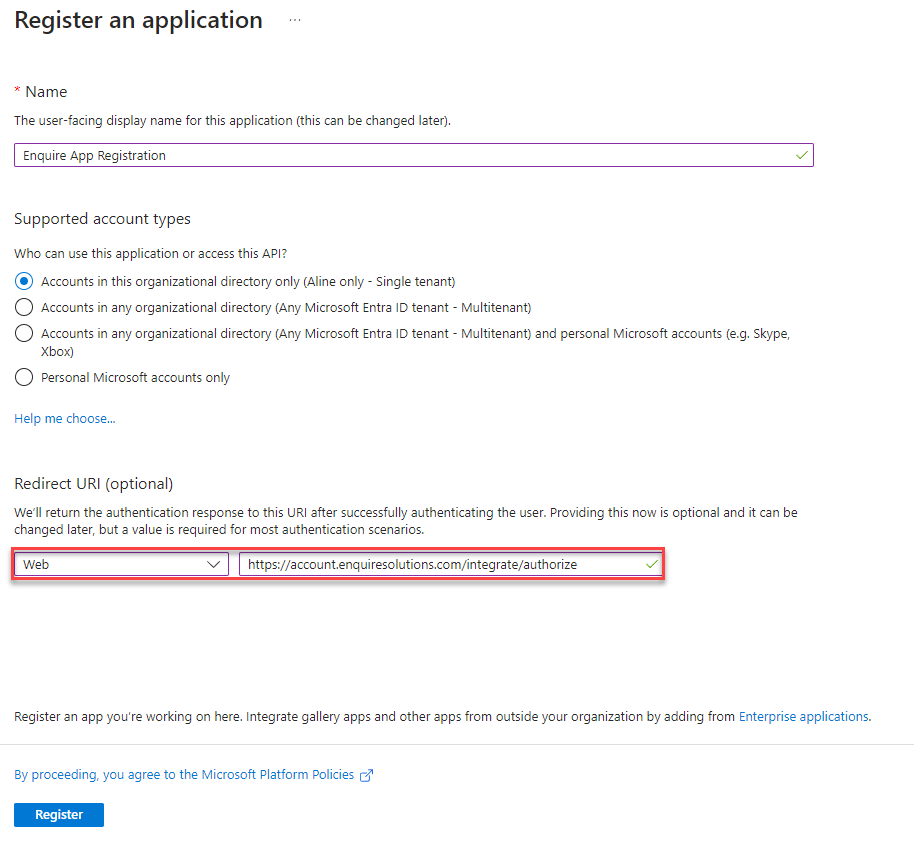
Step 3: Give the app your preferred name, and under Redirect URI choose Web in the dropdown and add the Redirect URI, then click Register.
Redirect URI for United States Customers: https://account.enquiresolutions.com/integrate/authorize
Redirect URI for Canadian Customers: https://crm.ca.alineops.com/integrate/authorize
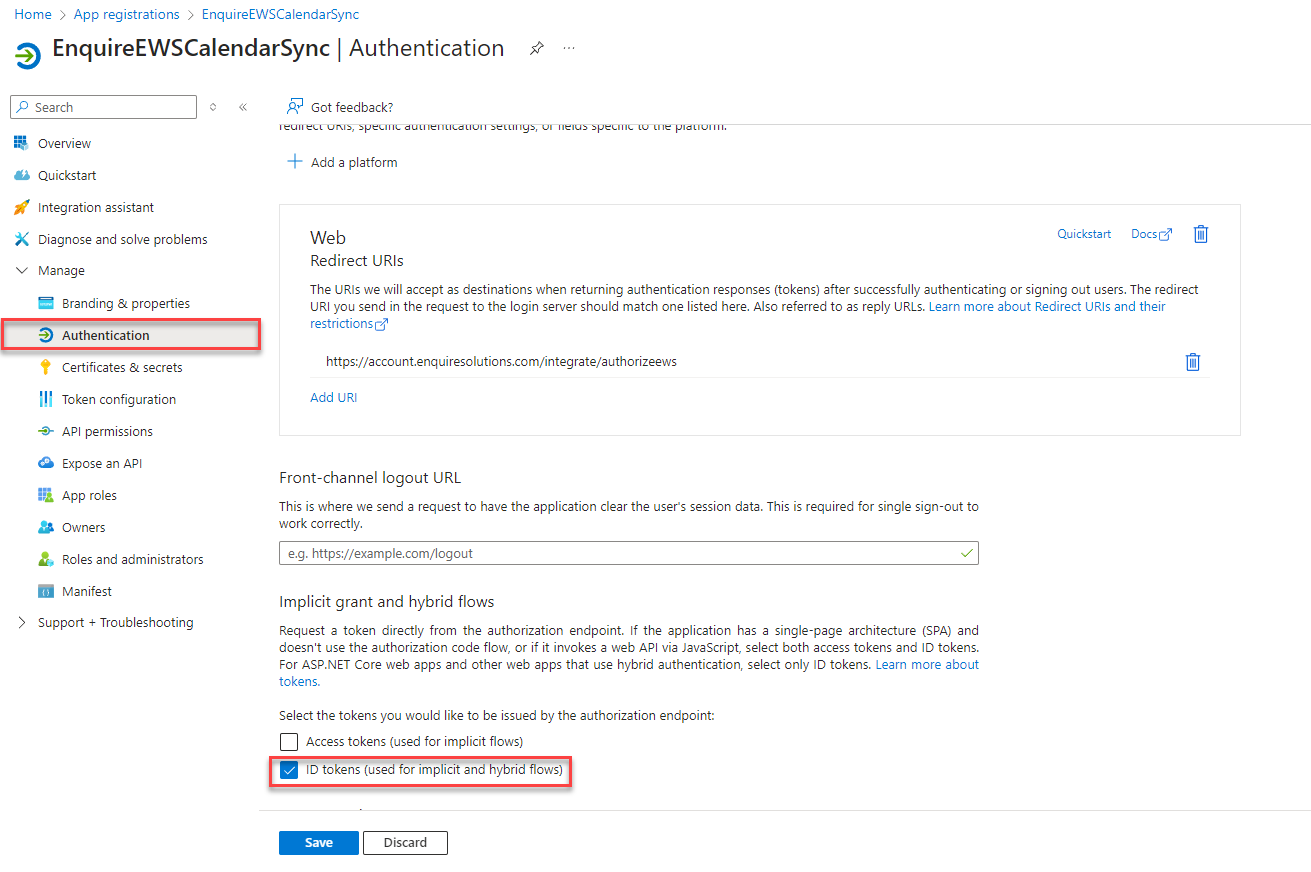
Step 4: Click Authentication in the left-hand menu and check the box ID tokens.
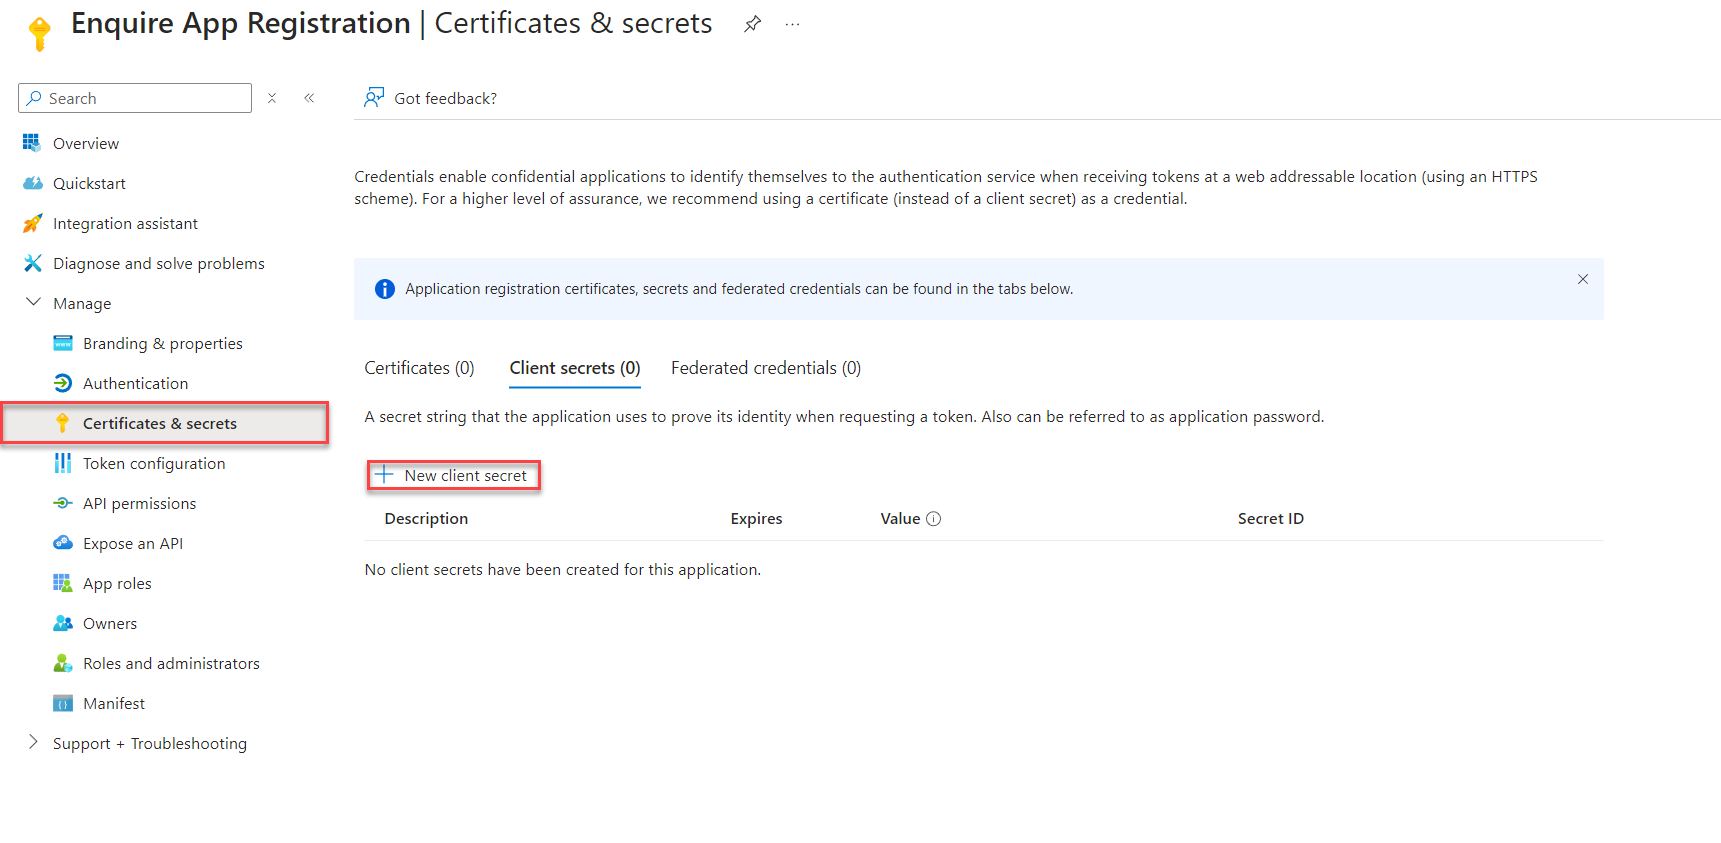
Step 5: In the left-hand menu, choose Certificates & Secrets and click + New Client Secret.
Step 6: Give the Client Secret a description (for example, Aline Calendar Sync) and set the expiration to the longest period your organization allows; we recommend 24 months.
Save the client secret value and store it somewhere, you will no longer be able to access it after leaving the page.
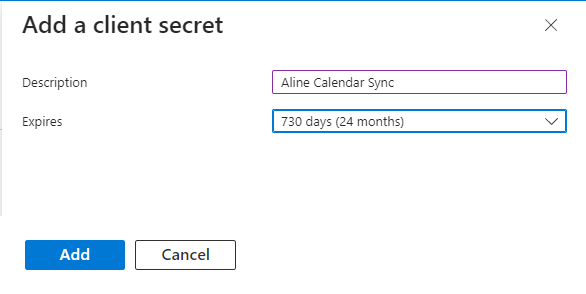
Step 7: Click the copy icon next to Secret Value and paste it into a notepad. This will be needed later to complete the setup.

Step 8: Choose API permissions in the left-hand menu and click + Add a Permission.
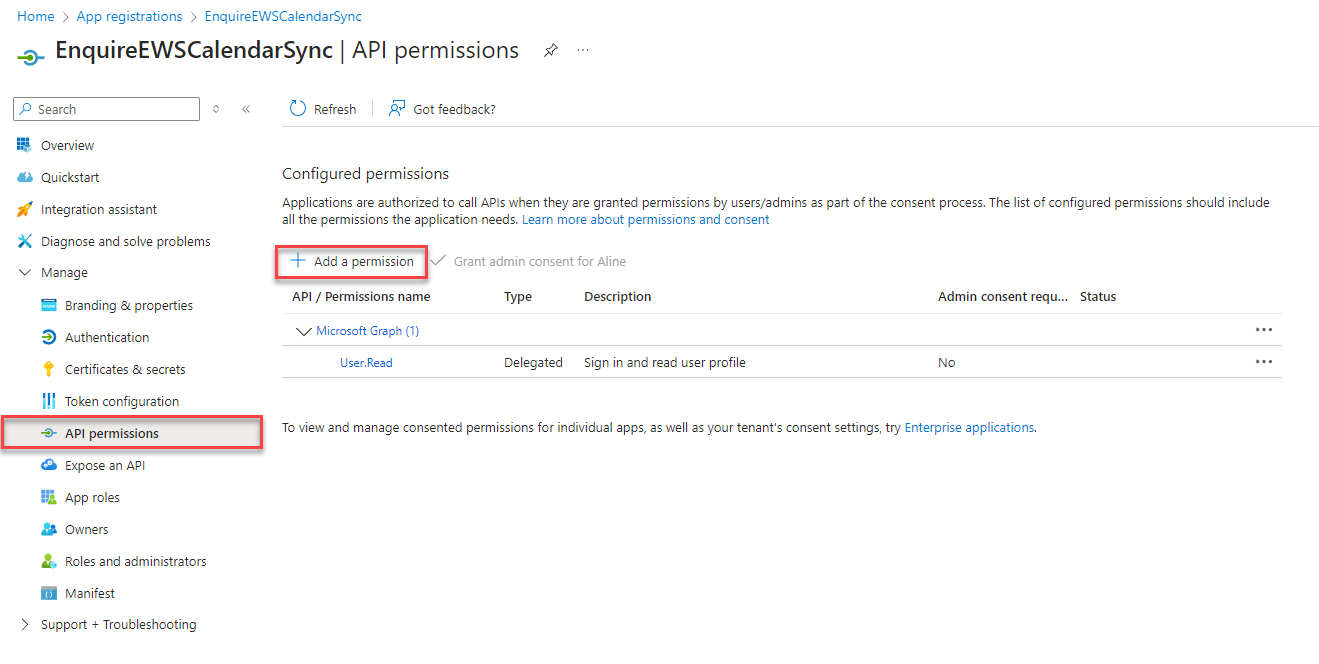
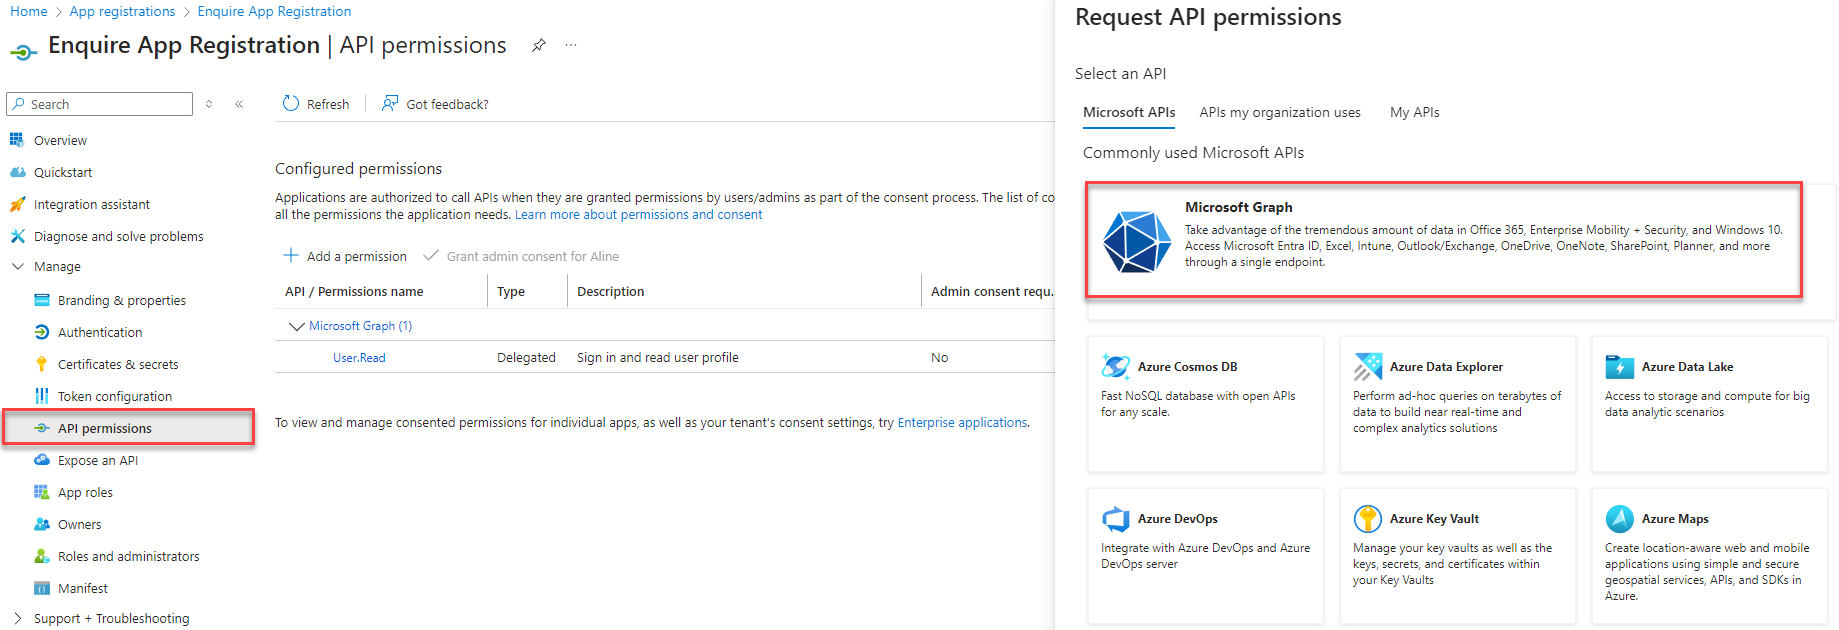
Step 9: Select the Microsoft APIs tab and choose Microsoft Graph.
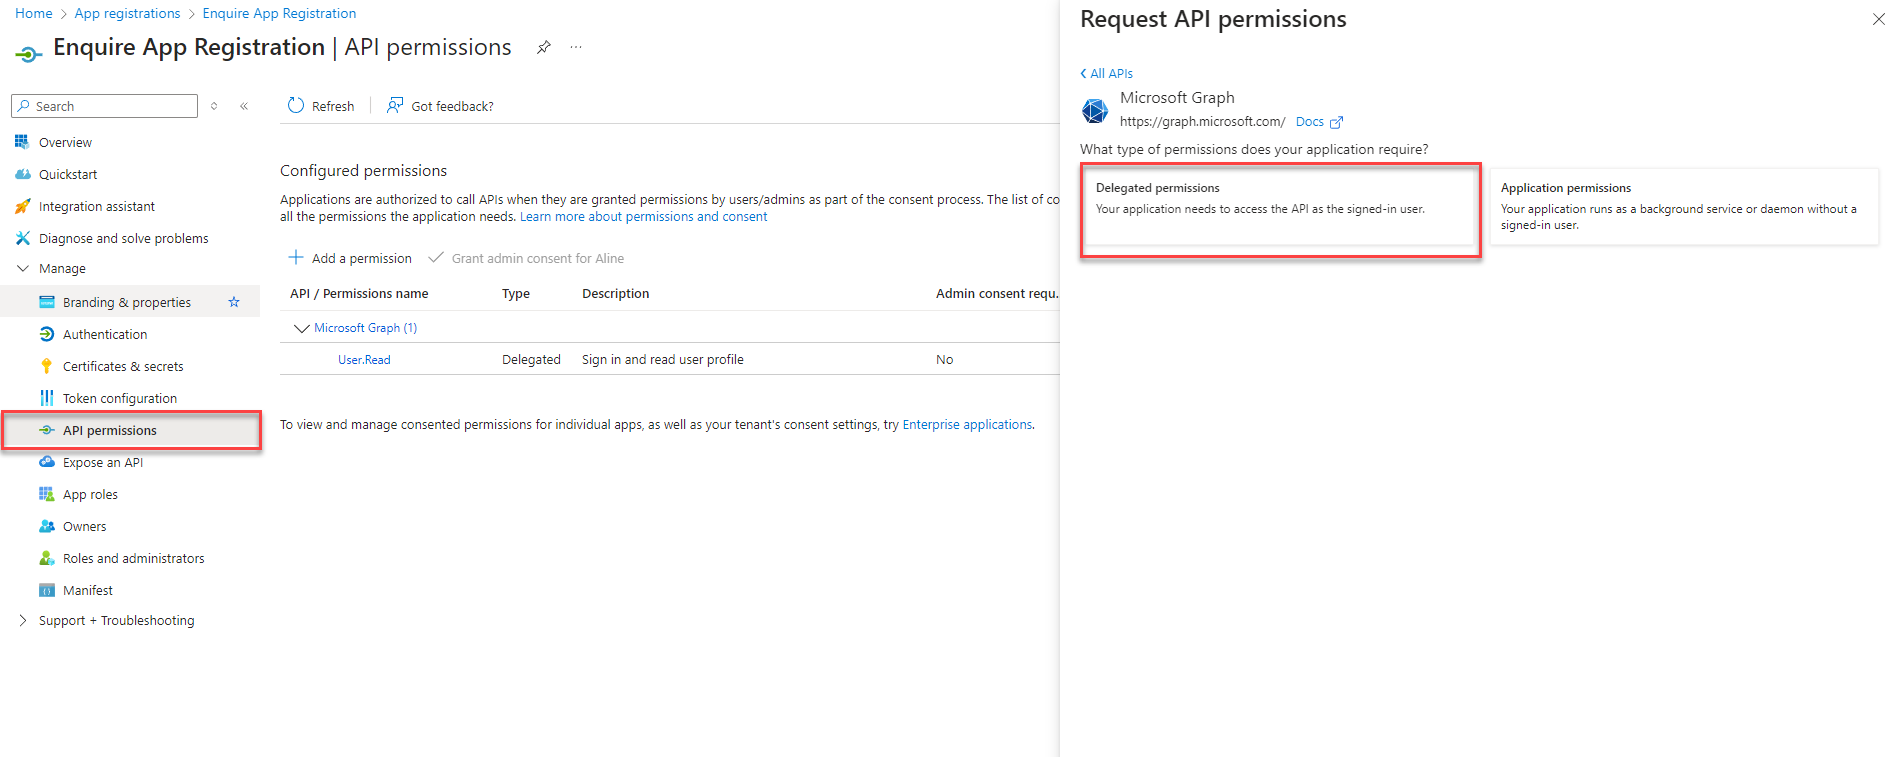
Step 10: Select Delegated permissions and add: Mail.Read, Mail.ReadWrite, Mail.Send, offline_access, profile, openid, Calendars.ReadWrite.
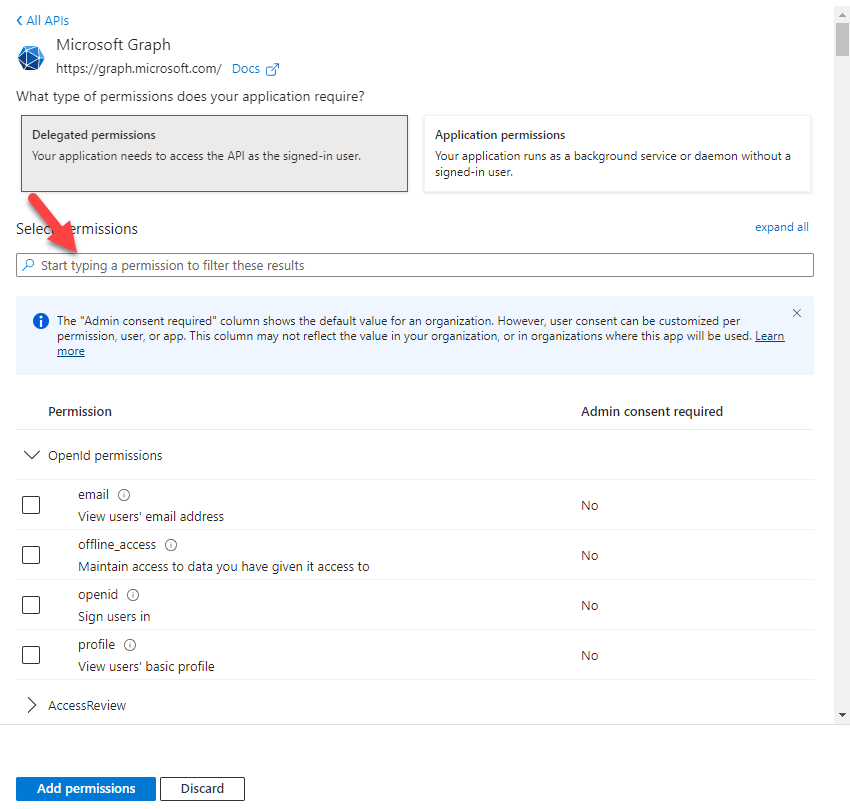
Step 11: Click Add Permission.
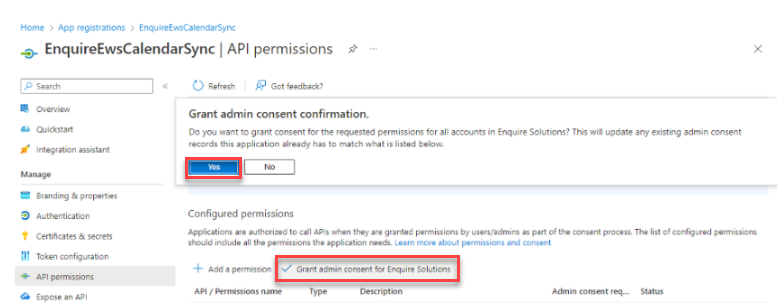
You must be a Privileged Role Administrator to complete this step.
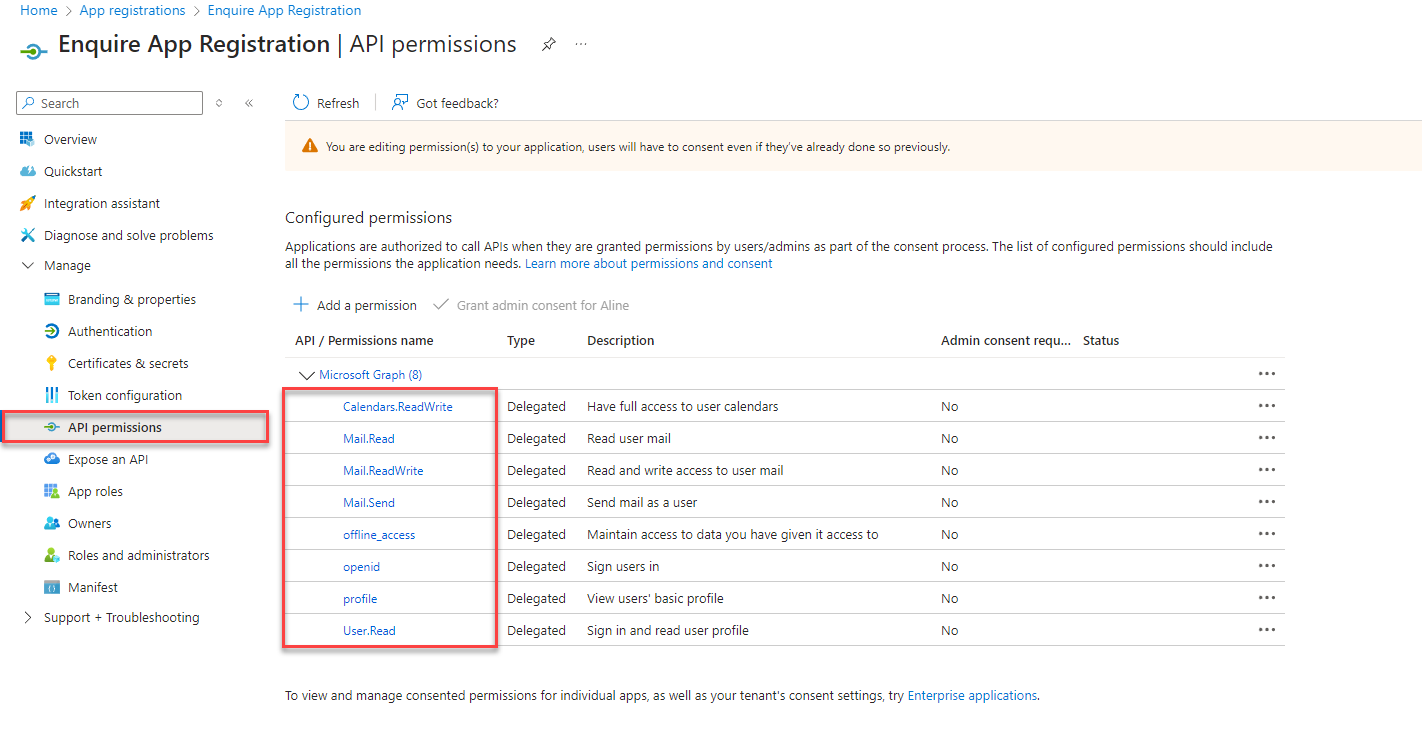
Step 12: Select Grant Admin Consent for {your organization}.
Step 13: Choose Overview in the left-hand menu to view your Application (Client) ID and Directory (Tenant) ID and record them.
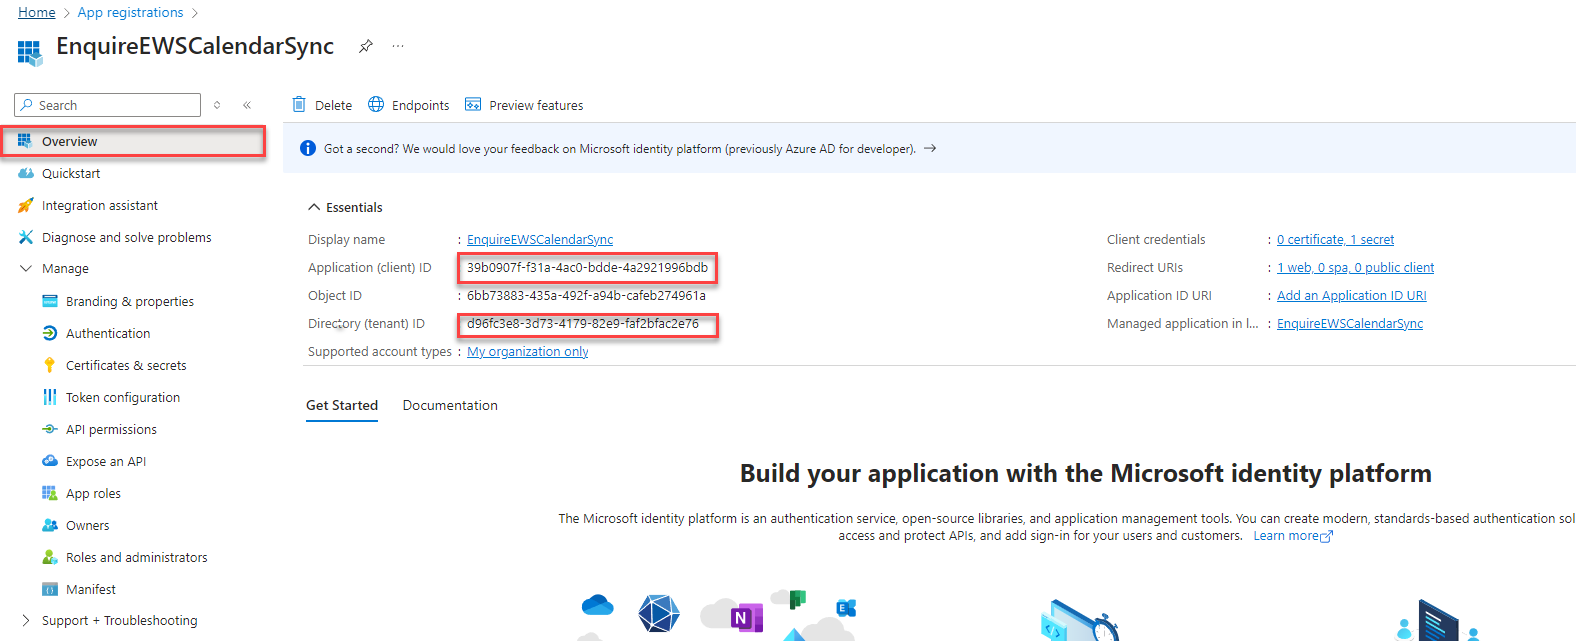
Step 14: Confirm you have these three credentials for the CRM setup portion: Application (Client) ID, Tenant ID, Client Secret Value.
The Client Secret Value is different from the Secret ID; the CRM needs the Value.
Your app registration is now complete. Proceed to CRM self-service setup.
Aline CRM Admin Two-way setup instructions
You will need CRM admin user permission to set up this portion.
CRM prerequisites
Before adding the host, confirm these exist in the CRM. Without them, activities will not be created and emails will fail to sync:
- Activity Master Types "Email In" and "Email Out," marked web-active.
- "Outreach Email In" and "Outreach Email Out," if any of your communities use Referral-type individuals.
- An Activity Resolution with master type "Contact Made."
- At least one Activity Type to use as the default for events imported from Outlook.
CRM Login
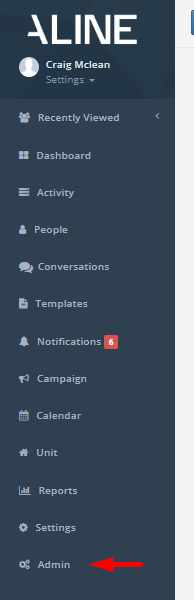
Step 1: Log in to Aline CRM and access the Admin section from the left-hand menu.
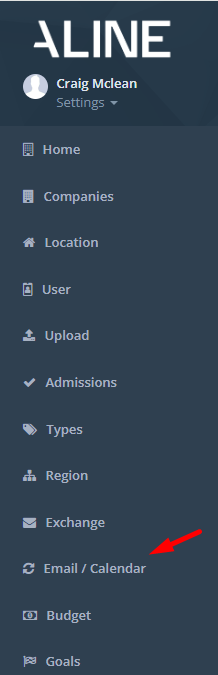
Step 2: Select Email / Calendar in the left-hand menu.
 |  |
Add Host
Step 3: Click Add Host in the top-right of the Hosts section.

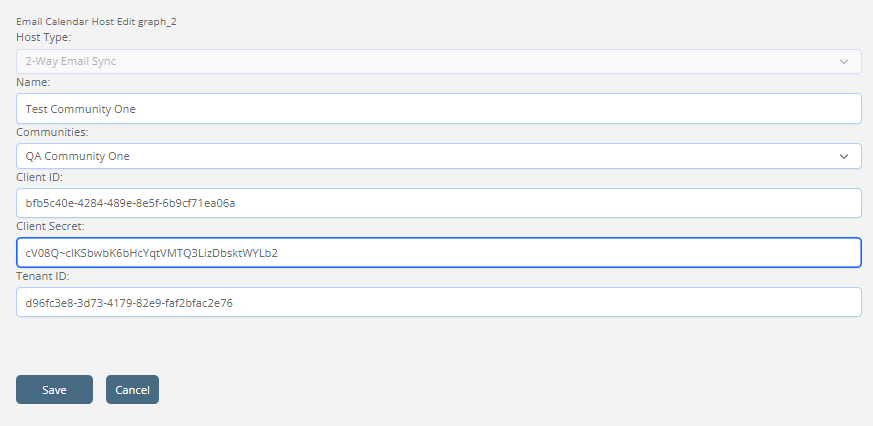
Step 4: Complete the new host form and save:
- Select O365 Accounts as host type.
- Create a host name (for example, "Client Name O365 Accounts").
- Leave the community field as All Communities. Office 365 hosts apply to every community in your account; there's no option to scope one to a subset.
- Add the three Auth credentials captured from your app registration.
If you don't have the Client Secret Value saved, you'll have to repeat the app registration in Azure.
Click Save.
Add Users
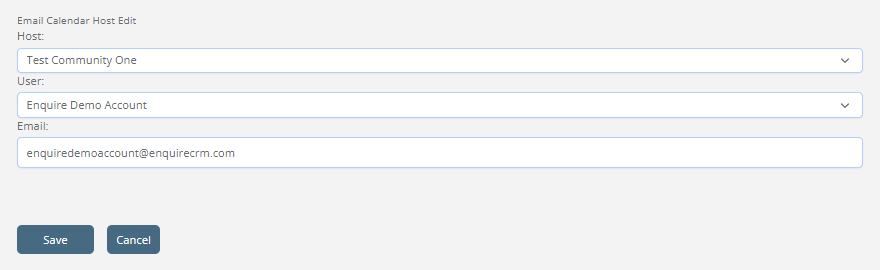
Step 5: Click Add O365 Account in the Email / Calendar module to add users to sync.

Step 6: Select the user to add, then click Save.
Step 7: Repeat steps 5-6 for each user who needs 2-way email sync.
Users may also add themselves. See Office 365 Integration: User Setup.
Step 8: In the Hosts section, click the key icon to send an authorization banner to all users.
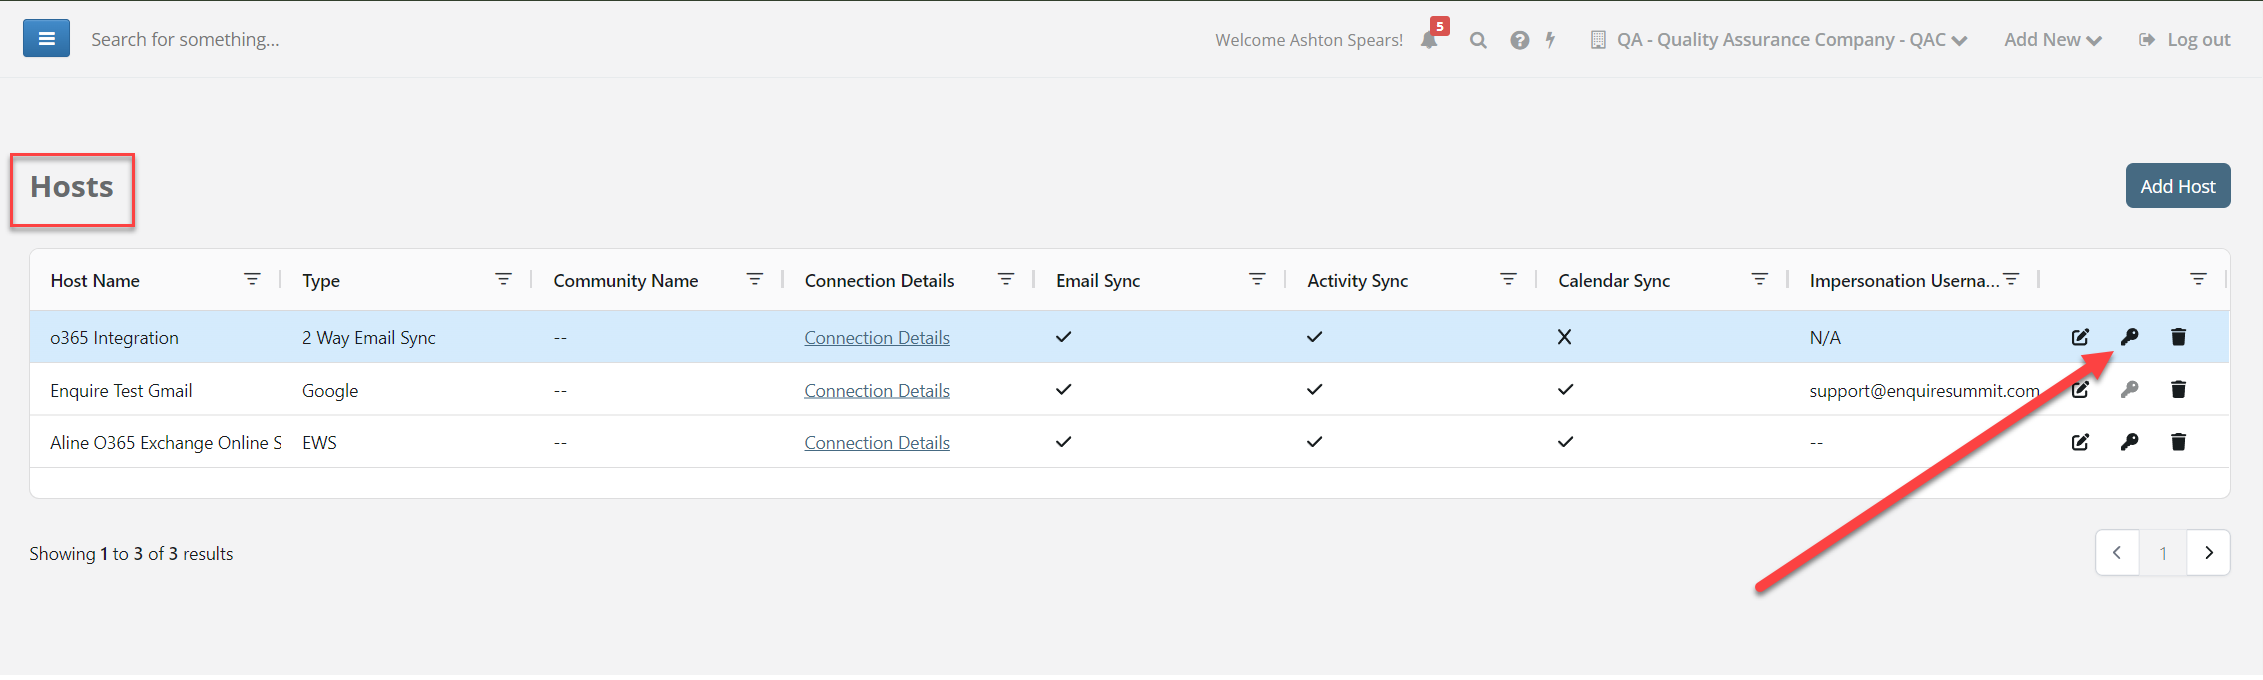
The CRM Admin portion is now complete.
Sync will not work until the user has authenticated their account to establish the user token.
Setup is now complete. For what each user needs to do next, see Office 365 Integration: User Setup. For details on what syncs and how, see Office 365 Integration: How It Works. For answers to common setup and troubleshooting questions, see Office 365 Integration: FAQ.
Was this article helpful?
That’s Great!
Thank you for your feedback
Sorry! We couldn't be helpful
Thank you for your feedback
Feedback sent
We appreciate your effort and will try to fix the article