Overview
The Advanced Search is a fantastic tool to use if you're seeking to pull data from specific criteria found on profiles. For example, you can pull a list of all individuals who have a specific Care Level selected on their profiles, or a list of all your Prospects with a physical address entered on their profile. In this article we will review how to:
- Using Advanced Search
- Common Advanced Search Examples
- Saving and Utilizing Lists via Advanced Search
- Running a Complex Search
- Exporting Advance Searches
Using Advanced Search
Step 1: Click the Advanced Search icon in the top menu. Or go to the People section on the left hand menu and select advanced.

Step 2: If you have access to multiple communities in the system, you can narrow down your search to specific communities by using the checkboxes next to the community names. 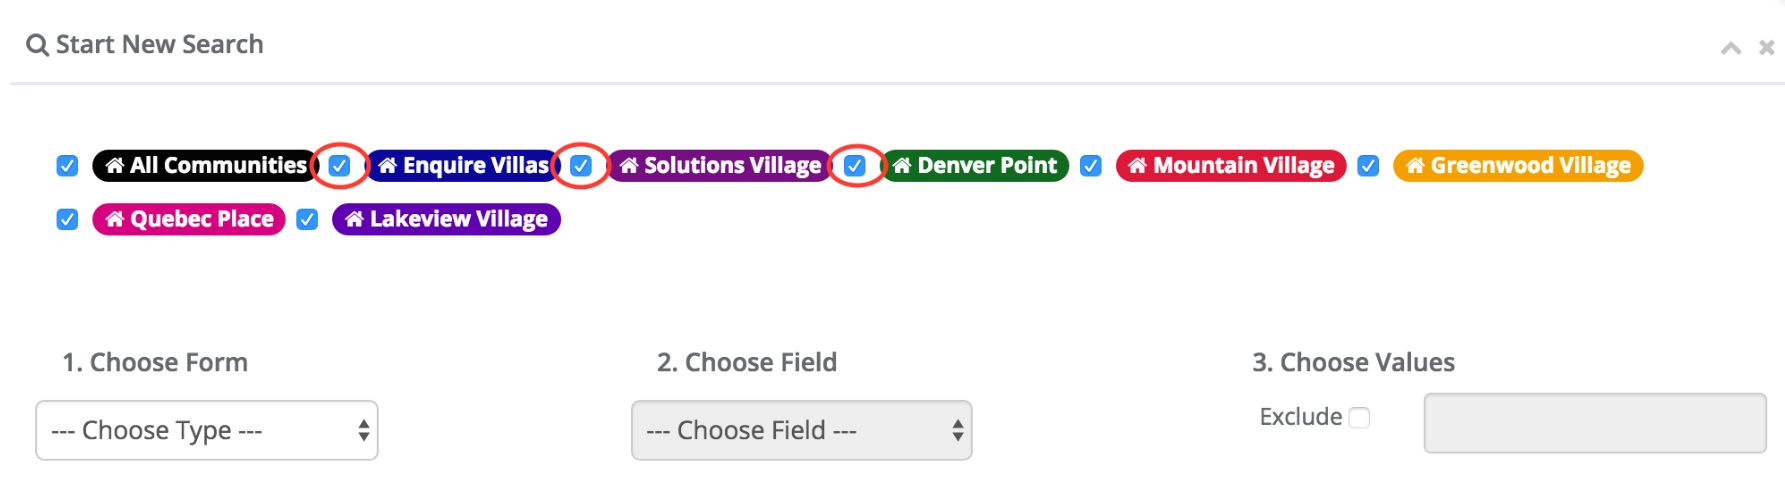
Step 3: Define your criteria by selecting from the drop downs. You'll notice the different Forms listed in the 1. Choose Form dropdown. These Forms correlate to the Forms you will find on a profile. For example, the General Information form is found on all profiles in the system: 
Step 4: In this example, I will be searching for every Prospect with a Salutation of "Mr.". Here is what my first Criteria Row will look like.

Note: If you'd like to search for multiple values in the 3. Choose Values section, you can hold Ctrl (CMD on a Mac) + click the desired values you're seeking.
Step 5: Since we want to narrow down our search for Prospects only, we will need to add a new Criteria Row by clicking on the green +Add Criteria button. This will allow us to search for more criteria that profiles need to meet in order to be brought in this search.
Step 6: In order to search for Prospects, we will need to select the Default form. Take a look at all the Fields you can select when you have the Default form selected.

Step 7: Once you're satisfied with your search, you can click the blue Search button and the search will execute.
Step 8: Once the search completed, you will see all the results of profiles that have matched your search criteria. In this case, there appears to be 19 profiles who are Prospects with a Salutation of "Mr".

Step 9: From here, you can click directly on the profile names which will load the profile, you can save the list to run it at future dates, and you can also export this list to Excel.
Common Advanced Search Examples
Prospect Mailing List
If you want to send a mailing list to all your active prospects with an address you may pull the following:

Prospect Primary Contact List
If you want to pull a list of all primary contacts of prospects you can do so:

Contacts of Residents List
If you want to send a monthly newsletter or mailing to all contacts of your residents you can use these filters:

Active Prospects/Contacts who have Toured
Suppose you want to invite all active prospects who have toured into the community. You would use this criteria:

Active Prospects who have Deposited
If you want to pull a list of all prospects who have deposited, choose the following:

Searching for a Zip Code
If are looking for a list of active prospects with a zip code, you can choose the following:

Note: you can remove the "postal code" and pull "has address" and export to search for the postal code in the Excel spreadsheet.
Saving and Utilizing Lists via Advanced Search
Saving a List
Saving lists is a powerful tool that allows you to save a search you may run frequently.
Step 1: Fill in the fields with the search criteria you would like to save.
Step 2: Click Save as list at under the Choose Saved List section.

Utilizing Lists
Step 1: You can run your list by selecting your list from the advanced search saved list drop down.

Step 2: This will load in all of the saved criteria for that list. Click the blue search button at the bottom of the advanced search page to run your search.
Create Mass Activities from a List
Create a large number of activities using a list that you have saved.
Step 1: Choose a list from the Choose Saved List section.

Step 2: Click the Create Activity button

Step 3: Fill out the Mass Activity form and click Add. This will create an activity for each of the profiles in the list. If creating a Mass Activity for a large number of individuals, please ensure the 'All Day' box is checked or each individual activity will be shown on your Enquire Calendar. If wanting to log a Mass Activity for something that has already been completed, Please make sure the 'Status' is set to Completed during the creation of this Mass Activity or each activity will need to be completed individually.

Add a List to a Campaign
Step 1: Navigate to the Campaign that you would like to add the list to
Step 2:Below the text Add people to Campaign by: click List

Step 3: From the drop down, choose the saved list, a response if one is necessary, and then click Add

Making lists public
Step 1: On the left menu, click People and click Lists.

Step 2: To the right of any list click the switch below Public? from OFF to ON. Click this switch again to make the list Private.

Step 3: Your list is now public.
Note: Lists are created as private by default.
Saved Lists FAQ's
- List visibility is determined by your community access. For example, if I create a list from the following Advanced Search criteria only users at the Solutions Village, Denver Point, and Mountain Village communities will have access to this list when I make it public because I have only selected these communities for the search. This also means that if someone with access to only one of the three selected communities views the list they will only see results for their community.

- When someone in your company or community makes a list public, the Public? column will read Yes for the specific list. This lets you know that the list was created by another user and made public.

Note: Only the creator of a list can sync the list or delete the list.
Running a Complex Search
Step 1: Navigate to the Advanced Search.
Step 2: In the Choose Saved List section, click into the drop down and select the list you would like to search within. This will run that saved List.

Step 3: Click the Advanced Options button.

Step 4: In the second drop down that will appear, select the list you would like to run against the first list you selected.

Step 5:Click Show Results


Saving a Complex Search as a New List
You can save your Complex Searches as a new list by clicking the Save List button after choosing the two lists you would like to compare.

Complex Search Example
Now let's take what we learned and go through a common Complex Search example. In this example we will be looking for all of our contacts of our Hot & Warm Leads. We will also want to make sure that these contacts have a physical address.
Step 1: We will create a list that looks for all of our Hot & Warm Leads. Take a look at the screenshot below for an example of this list. Also, don't forget to save this list. We will be using it a little bit later.

Step 2: Now we will need to create another list that will look for all active Contacts that have an address. Please take a look at the screenshot below for an example of this list. We will also want to save this as a new list.

Step 3: Now that we have the two lists we want to compare, lets pull the list we want to search within. In this example, that list will be the prospect list we created first. Then we will use the Advanced Options button to select the second list we want to use to look into our prospect list. Take a look at the screenshot below for an example of what this would look like.

Step 4: Click Show Results!
Step 5: You can now use the Save List button to save this as its own list or use the Export button to export the results to an Excel document.
Exporting Advanced Search
Step 1: Choose a list from the Choose Saved List drop down or start a new search using the options in the Start New Search section.
Step 2: Once your search results are displayed, you can click the blue Export button in the Choose Saved List Section or the small Excel icon next to the number of results found by your search.
Step 3: Once the download for your exported list finishes, click on it to open it in Excel.
Step 4: You may receive a notification like the one below, click Yes.
Available Fields to Export
The fields below are what is exported in the Excel file. This can be found on the export page:
Individual ID | Case Number | Middle Name | Work Number | Address Line 3 | Time Zone |
| Community | Date Created | Last Name | City | Creator ID | |
| Individual Community Count | Salutation | Home Number | Address Line 1 | State | Case Status |
| Company Community Count | First Name | Mobile Number | Address Line 2 | Postal Code | Age |
| Assigned First Name | Assigned Last Name | Assigned User ID | Birth Date | Website | Type |
| Creator First Name | Creator Last Name | Accept Date | Last Modified | Title | |
| Primary Contact First Name | Is Mailing List | Email 2 | Market Source | Inquiry | Fax |
| Primary Contact Middle Name | Campaign Name | Campaign ID | Market Source ID | Care | Lead Score Submitted |
| Primary Contact Last Name | Campaign Response | Spouse Name | Sales Status | Method of Contact | Expected Need |
| Campaign Reponses Array | Primary Contact Email | Primary Contact Address Line 1 | Primary Contact City | Primary Contact State | Current Arrangement |
| Full Name with Spouse | Primary Contact Full Name | Primary Contact Address Line 2 | Primary Contact State | Primary Contact Postal Code | Apartment Preference |
| Primary Contact Relationship | Primary Contact Home | Primary Contact Postal Code | Primary Contact Power of Attorney | Memory Loss | Ambulation Type |
Primary Contact Mobile | Primary Contact Work | Referral First Name | Referral Last Name | Referral Company Name | Gender |
| Marital Status | Religion | Language | Ethnicity | Veteran | Is Waitlist |
| Waitlist Priority | Waitlist Date | Task Move In Date | Task Move Out Date | Lease Move In Date | Lease Move Out Date |
| Active Lease Yes No | Move Out Reason | Lost Lead Reason | Unqualified Reason | Care Group | Floor Plan Group |
| Unit ID | Deposit | Entrance Fee | Monthly Fee | Lease Plan | Contract Type |
| Row Number | Individual Type ID | Campaign Individual Status ID | Lead Score Name | Community Name | First Campaign |
| Statement Method Type | Age Code Type | Medical Type | Individual Type Friendly | Tour Date | Individual Type Name |
| Individual Status Text | Individual Type Full | Individual Type Full Friendly | Individual Type Full Bubbles HTML | Case Number Friendly | Individual Full Name |
| Campaign Individual Status | Campaign Individual Status CSS | Next Activity Date Convert Friendly | Next Activity Date Convert | Phone 1 Opt In | Phone 1 Opt Out |
| Phone 1 Date Opt In | Phone 1 Date Opted Out | Phone 1 Listed on DNC | Phone 2 Opt In | Phone 2 Opt Out | Phone 2 Date Opted In |
Phone 2 Date Opted Out | Phone 2 Listed On DNC | Phone 3 Opt In | Phone 3 Opt Out | Phone 3 Date Opted In | Phone 3 Date Opted Out |
Phone 3 Listed On DNC | Addresses - Address Line 1 | Addresses - Address Line 2 | Addresses - City | Addresses - Country | Addresses - County |
Addresses - End Month | Addresses - Has Address | Addresses - Has Email | Addresses - Has Phone | Addresses - Mailing Name | Addresses - Postal Code |
| Addresses - Start Month | Addresses - State | Company - Organization Tier 1 Type | Company - Organization Tier 2 Type | Company - Organization Tier 3 Type | Company - Organization Tier 4 Type |
| Company - Organization Type | Company - Top 5/Targeted | Company - Visit Frequency |

Was this article helpful?
That’s Great!
Thank you for your feedback
Sorry! We couldn't be helpful
Thank you for your feedback
Feedback sent
We appreciate your effort and will try to fix the article